The concept of segmentation has been around for a long time and most of us would probably agree that, done properly, it’s a concept that allows for significantly improved targeting of potential audiences and customers.
On our travels in recent weeks we’ve been casually asking people how they apply segmentation, if at all, to data they’ve collected from their online activity. In particular, we were curious to find out just how many people segmented their digital data as part of the process of making their online activity more efficient and accountable.
Surprisingly, while most did have Google Analytics installed, few used the segmentation features it provided. Most, if any comparison was done, simply used the standard reports to look at numbers such as visit levels and bounce rates, with the comparison being between different traffic sources or different time periods.
Common themes were that users either didn’t know what useful data they could segment or that they simply didn’t know how to use the feature.
In an effort to offer some guidance to those people, here is a quick example of where to setup the segmentation feature in Google Analytics, followed by some basic examples of data you could generate from the sample segment.
Setting up Segmentation in Google Analytics
As an example, let’s assume we have an ecommerce site where we want to know more about the differences between those who spend over £50 and those who spend under £50 (but more than £0).
1. Login to Google Analytics as normal and visit your dashboard (this assumes you’re using the latest version of Google Analytics).
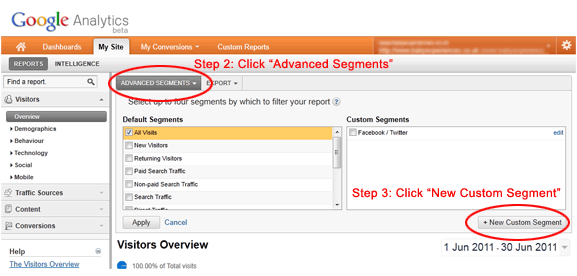
2. Click on the Advanced Segments Tab and a new section will open.
3. Click on New Custom Segment

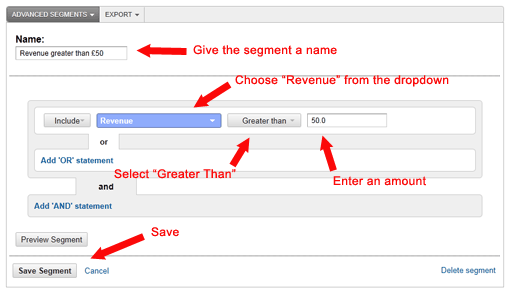
4. On the new page, give the segment a name, choose the Revenue criteria from the dropdown, choose Greater Than and enter a value.
5. Press “Save Segment”

Now repeat the process to create a similar segment, but for less than your value.
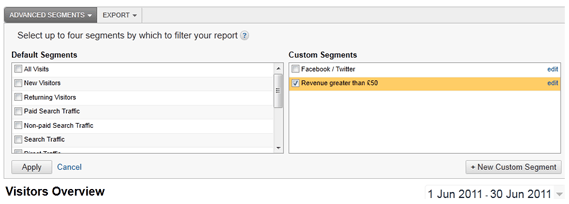
Once you’re finished, go to one of your Google Analytics reports as normal. Then select the “Advanced Segments” tab again as you did on step 2 above. You’ll now see your new segments available for selection under the Custom Segments menu. Select your new segment(s) and press “Apply”.

You’ll now see the same reports restricted to only include those sessions that are part of your segment.
Questions you could now answer if you applied this segment to various reports:
Now that you’ve created your segments, here are some of the questions you should now be able to find answers to:
1. How many visits do users make before they’ll spend over £50 compared to spending under £50?
2. What differences are there in keyword trends in search engines for those spending over and under £50? i.e. longer search queries? Geographic terms? Branded terms?
3. Despite the difference in visits from various traffic sources, which yield the higher sale price? Direct traffic? Social media? Email? Search?
4. What landing pages were most common from those spending over £50 compared to those spending under? And can anything be learned from those pages … or more people pushed to them?
5. How do those different buyers interact with other functions on site? Do they also signup for newsletters? Click social buttons? Download PDFs?
Segmentation can provide huge amounts of useful information to make your online efforts more efficient, so we recommend you play around with them and get to know them.


